DPM Glock Recoil Spring Assembly
Assembly Instructions for Standard Recoil Springs:
For: Generation 1, 2 & 3 Glock 17, Glock 18, Glock 19, Glock 20, Glock 21, Glock 21SF, Glock 22, Glock 23, Glock 25, Glock 31, Glock 32, Glock 37, Glock 38
ATTENTION: INSTALLATION / SAFETY NOTES:
- Use the DPM Recoil Reduction system Only for the listed types and models of pistol on the packing. DO NOT USE the system on other pistol models. It may cause damage to the recoil system and possibly to the pistol as well.
- Always use one of the included springs (usually the longer spring is the heavy). If include other parts like Spring Plugs, Washers and Spacers Please read the following instructions.
- Our products do not invalidate the existing guidelines concerning the safe and correct way to use your pistol.
- DO NOT USE THIS PRODUCT ON MODIFIED PISTOL. If your pistol is modified internally please contact us for further information or a customized solution.
Attention: DPM Systems Technologies Ltd and its distributors are not responsible for any damage or injury that may happen due to the incorrect placing or use of its products.
Some of the DPM Systems come with two separate springs or more so the shooter can fine-tune the weapon for his/her personal standards. The longer spring (more coils) is stronger and has a heavier pound rating than the shorter spring.
GENERAL INSTALLATION INSTRUCTIONS:
- Make sure firearm is unloaded.
- Disassemble the pistol.
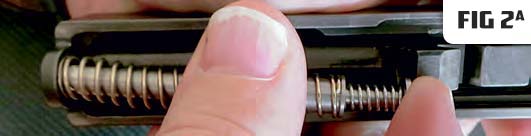
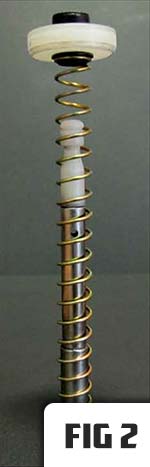
- Replace the standard guide rod with the DPM multi springs system (metallic guide rod) as shown in figure (Fig. 1, 1a, 2, 2a, 3, 3a).


- Ensure that the DPM system is placed in the correct way (Fig. 4).

- Reassemble the pistol.
- Before loading the magazine, rack the slide several times to ensure that the DPM system functions unrestricted.
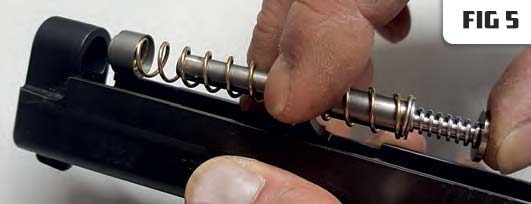
INSTRUCTIONS FOR DPM RECOIL SYSTEMS EQUIPPED WITH SPRING PLUG OR WASHER:
- . Use Always the Spring Plug or the Washer if your DPM Recoil System is equipped with.
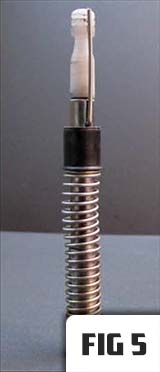
- Insert on the DPM Recoil System an External Spring of your choice with the DPM Spring Plug in the slide pistol (Fig. 5)
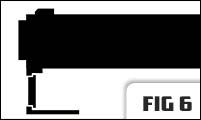
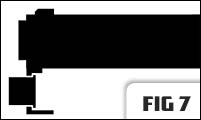
- Insert the DPM Washer in the slide pistol and then insert the DPM Recoil System with an External Spring of your choice. (Fig. 6 & 7)
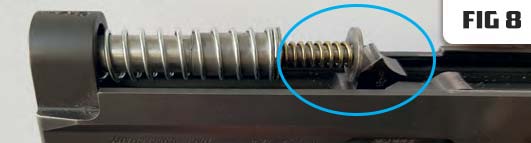
- Place the head of the Recoil System to fit in the correct position of the barrel. (Fig. 8)
Assembly Instructions for Recoil Springs w/ Safety Pin:
For: Generation 1, 2 & 3 Glock 17L, Glock 24C, Glock 34, Glock 35
ATTENTION: INSTALLATION / SAFETY NOTES:
- Use the DPM Recoil Reduction system Only for the listed types and models of pistol on the packing. DO NOT USE the system on other pistol models. It may cause damage to the recoil system and possibly to the pistol as well.
- Always use one of the included springs (usually the longer spring is the heavy). If include other parts like Spring Plugs, Washers and Spacers Please read the following instructions.
- Our products do not invalidate the existing guidelines concerning the safe and correct way to use your pistol.
- DO NOT USE THIS PRODUCT ON MODIFIED PISTOL. If your pistol is modified internally please contact us for further information or a customized solution.
Attention: DPM Systems Technologies Ltd and its distributors are not responsible for any damage or injury that may happen due to the incorrect placing or use of its products.
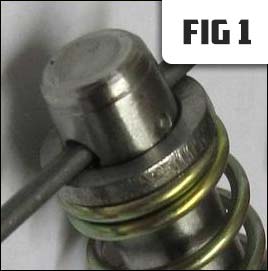
- Always use one(1) washer with the DPM recoil rod (Fig 1)
- Install one(1) spring on the rod and one on the washer, compress it and insert the safety pin in the small hole of the rod (Fig 2). Now the DPM recoil spring is ready for installation.

- Insert the DPM rod in the slide hole and press it to click on the correct position of the barrel (WHILE KEEPING THE SAFETY PIN INSIDE) (Fig 3).

- Finally pull out the safety pin and ensure that the DPM rod and the washer are placed in the correct position (Fig 4).

- Before using your handgun please function the slide several times to ensure that the DPM Recoil System functions unrestricted .
Assembly Instructions for Glock Gen 4 Recoil Springs:
For: Generation 4 Glock Models.
ATTENTION: INSTALLATION / SAFETY NOTES:
- Use the DPM Recoil Reduction system Only for the listed types and models of pistol on the packing. DO NOT USE the system on other pistol models. It may cause damage to the recoil system and possibly to the pistol as well.
- Always use one of the included springs (usually the longer spring is the heavy). If include other parts like Spring Plugs, Washers and Spacers Please read the following instructions.
- Our products do not invalidate the existing guidelines concerning the safe and correct way to use your pistol.
- DO NOT USE THIS PRODUCT ON MODIFIED PISTOL. If your pistol is modified internally please contact us for further information or a customized solution.
Attention: DPM Systems Technologies Ltd and its distributors are not responsible for any damage or injury that may happen due to the incorrect placing or use of its products.
- Use always ONLY ONE WASHER (ring) with the DPM RECOIL ROD.
- Install one of the two washers with the big diameter side of the slide hole (Fig. 1).
- Install the main spring on the recoil rod, compress the recoil rod with the spring to insert the rod in the washer’s hole and push to lock on the correct position of the barrel.
- Before loading the magazine on the pistol function (open / close) the slide several times to ensure that the DPM Recoil System has been installed correctly and functions unrestricted.
Washer Properties (Fig 1)
- We recommend to use the small washer when you use 9 mm factory loads or soft homemade loads.
- For 40s&w, 357Sig caliber we recommend to use the big washer which will give you a heavier buffer (slide full open position).
- Washers are responsible only for the buffer force (slide full open position) and the external springs are responsible only for the slide closed position (slide on the battery).

Assembly Instructions for Glock 42 & 43 Recoil Springs:
For: Generation 4 Glock 42, Glock 43.
ATTENTION: INSTALLATION / SAFETY NOTES:
- Use the DPM Recoil Reduction system Only for the listed types and models of pistol on the packing. DO NOT USE the system on other pistol models. It may cause damage to the recoil system and possibly to the pistol as well.
- Always use one of the included springs (usually the longer spring is the heavy). If include other parts like Spring Plugs, Washers and Spacers Please read the following instructions.
- Our products do not invalidate the existing guidelines concerning the safe and correct way to use your pistol.
- DO NOT USE THIS PRODUCT ON MODIFIED PISTOL. If your pistol is modified internally please contact us for further information or a customized solution.
Attention: DPM Systems Technologies Ltd and its distributors are not responsible for any damage or injury that may happen due to the incorrect placing or use of its products.
- Use always the WASHER (ring) with the DPM RECOIL ROD.
- Install the washer with the big diameter side of the slide hole (Fig. 1).
- Install the main spring on the recoil rod, compress the recoil rod with the spring to insert the rod in the washer’s hole and push to lock on the correct position of the barrel.
- Before loading the magazine on the pistol function (open / close) the slide several times to ensure that the DPM Recoil System has been installed correctly and functions unrestricted.

Assembly Instructions for Recoil Springs w/ Glass Breaker:
ATTENTION: INSTALLATION / SAFETY NOTES:
- Use the DPM Recoil Reduction system Only for the listed types and models of pistol on the packing. DO NOT USE the system on other pistol models. It may cause damage to the recoil system and possibly to the pistol as well.
- Always use one of the included springs (usually the longer spring is the heavy). If include other parts like Spring Plugs, Washers and Spacers Please read the following instructions.
- Our products do not invalidate the existing guidelines concerning the safe and correct way to use your pistol.
- DO NOT USE THIS PRODUCT ON MODIFIED PISTOL. If your pistol is modified internally please contact us for further information or a customized solution.
Attention: DPM Systems Technologies Ltd and its distributors are not responsible for any damage or injury that may happen due to the incorrect placing or use of its products.
WARNING: Before the installation read and follow the following operating and safety instructions:
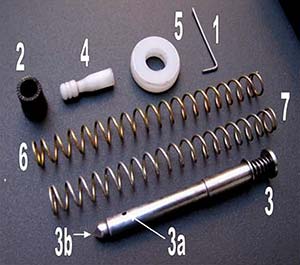
Parts:
1: Safety Pin
2: Bushing Ring
3: DPM Recoil Rod
3a: Recoil Rod Side Hole
4: Carbide Cover
5: Compressing Ring
6, 7: Main Springs
- During the installation and removal of the DPM rod on your pistol ALWAYS COVER the Sharp Carbide (the glass brakes tip)with the Carbide Cover (Fig 1).
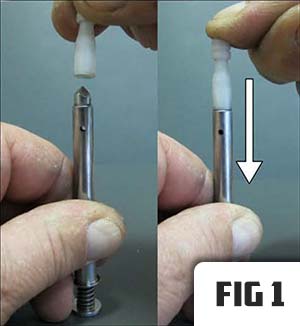
- Place one(1) main spring on the rod, place the bushing ring on top of the spring the white compressing ring (Fig 2).
- Compress the spring and the bushing ring until you have a clear view of the hole on the side of the rod and then insert the safety pin (Fig 3).

- Remove the compressing ring (Fig 4).

- Now the DPM rod is ready for installation (Fig 5).
- Place the DPM rod in the slide hole and press from the back side of the DPM rod to release the safety pin (Fig 6).

- Remove the safety pin and let the rod travel back until it clicks on the correct position of the barrel (Fig 7).

- Assemble the slide on the frame and before loading the magazine function the slide several times to ensure that the DPM rod functions unrestricted.
- Remove the carbide cover from the DPM rod and now the pistol with the glass breaker is ready to use.
Assembly Instructions for Glock 26 Recoil Springs:
For: Glock 26.
ATTENTION: INSTALLATION / SAFETY NOTES:
- Use the DPM Recoil Reduction system Only for the listed types and models of pistol on the packing. DO NOT USE the system on other pistol models. It may cause damage to the recoil system and possibly to the pistol as well.
- Always use one of the included springs (usually the longer spring is the heavy). If include other parts like Spring Plugs, Washers and Spacers Please read the following instructions.
- Our products do not invalidate the existing guidelines concerning the safe and correct way to use your pistol.
- DO NOT USE THIS PRODUCT ON MODIFIED PISTOL. If your pistol is modified internally please contact us for further information or a customized solution.
Attention: DPM Systems Technologies Ltd and its distributors are not responsible for any damage or injury that may happen due to the incorrect placing or use of its products.
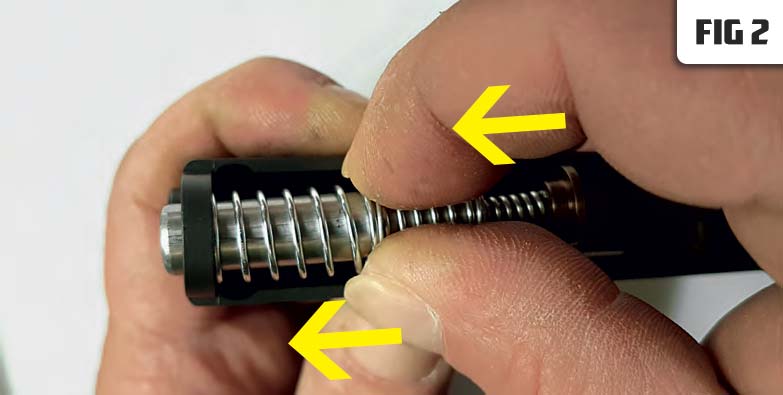
- With the Wider Coil facing the Slide, Push from the middle section, until the rod will pass through the Slide hole a few millimeters. (Fig. 1 & Fig. 2)

- Let the Rod return carefuly (Fig. 3) in the Correct Position on the Barrel (Fig. 4). Reassemble the Pistol. Rack the Slide to Conrm Proper Unrestricted Function.

- To Disassemble, Push Forward with your Thump from the behind to Release the System from the Barrel (Fig. 5) and Carefuly Retrieve the System in your Hands (Fig. 6).

